
Набор скриптов для создания фотоальбома
В этот набор входит 3 скрипта: Photobook_Library, Photobook_Layuot и Photobook_Reset. Первый из них создает индизайновскую библиотеку с различным расположением пустых фреймов, размеры которых привязываются к размеру страницы и её полям. В дальнейшем можно выбирать из библиотеки конкретную конфигурацию и ставить на страницу альбома, заполняя пустые фреймы своими фотографиями.
Вот так выглядит созданная библиотека и информация об одном из элементов библиотеки:
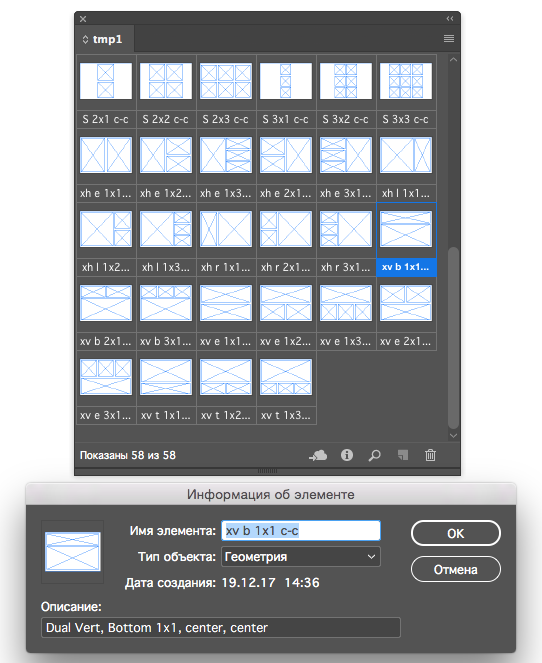
Данный элемент состоит из трех фреймов, один из которых будет размером как страница, а два других поменьше. Как я понял, фрейм с размером страницы предназначен для фона фотоальбома.
После запуске скрипта он попросит задать имя создаваемой библиотеке и её расположение на диске. Затем появится диалоговое окно, в котором можно указать много параметров — это и промежутки между фреймами, и их выравнивание, и даже создание дополнительных фреймов для подписей к фотографиям:
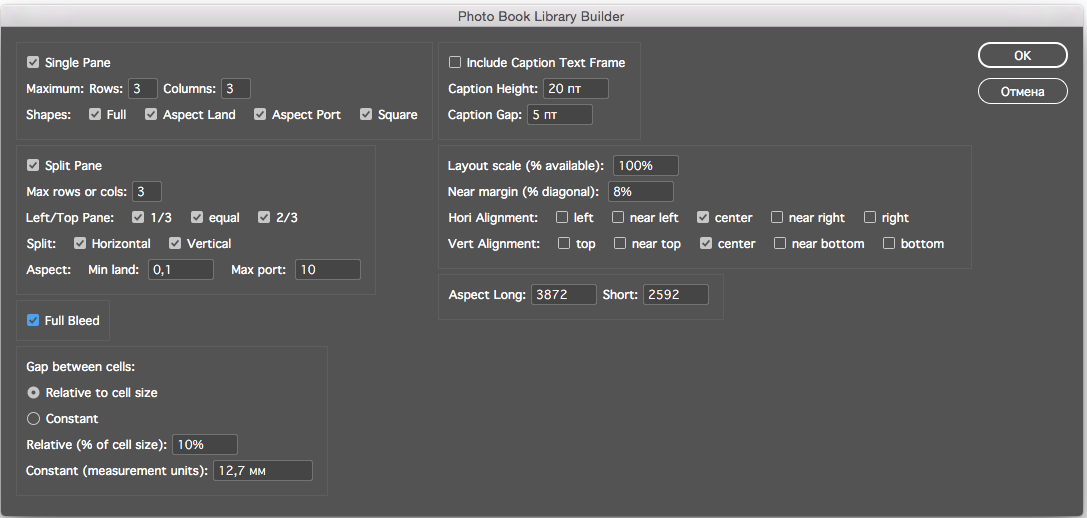
В общем, всё хорошо продумано для комфортной работы.
Если вы не нашли в библиотеке нужной конфигурации фреймов для страницы, то запускайте второй скрипт из набора (Photobook_Layuot) и создавайте своё уникальное расположение фреймов. Вот диалоговое окно второго скрипта:

- Single/First (top/left) Rows, Columns — The grid dimensions for a single-pane layout (or for the top or left pane of a dual-pane layout).
- Draw Guides — Draw guides at the edges of the graphics frames and optional text frames. These may be helpful if you are adding content in alignment with generated frames.
- Bleeds — Extends the image to the limit determined by the document bleed setting for one or more edges. Any or all of the edges can be used with a Shape of Full. Select all four Bleed edges and a Shape of Full for a full bleed. With a Shape of Aspect Land, Aspect Port, or Square only one edge or two adjacent edges can sensibly be used. In this case also set the Hori Alignment and Vert Alignment options to align the image to the selected bleed edge.
- Layout scale (% available) — The size of the layout is reduced by the given factor from the total available on the page or selected rectangle. Use this option to leave more white space on the page or space for text beyond the simple captions provided by the tools. While this option has an effect similar to the page margin, it is more convenient to adjust this while keeping the margins constant for the entire document.
- Near margin (% of diagonal) — Near alignments (near left, near bottom, etc.) are offset from the corresponding margin by this amount. This produces pleasing layouts with ample white space when used together with a reduced Layout scale.
- Hori & Vert Alignment — Sets the alignment of layouts that do not completely fill the space between margins. In the general case this includes any shape but Full and all shapes at scales less than 100%. The Center and Near alignments are at cross purpose with the Bleed options and should not be used together.
- Gap — The gap between cells is be specified as a percentage of the cell size or as a constant. The constant is given in the document’s default measurement unit or in other units by including the unit specifier (p, pt, in, etc.). (Note that the relative gap is based on the raw cell size determined by the space between the margins divided by the cell count, not the final cell size after gaps and aspect ratio adjustment.)
- Shape — The cell can be: Full — a rectangle filling the available space, possibly reduced by the Scale Factor, or extended by the Bleed options; Aspect Land, Aspect Port — a rectangle of the given aspect ratio; or Square. In the general case the square or aspect layouts will extend only to one of the two pairs of margins and will be aligned according to the Alignment option.
- Caption — A text frame is drawn below the graphic frame. The size of the frame and gap between the image and caption are given in measurement units.
- Split Pane — The page is divided into two panes, which can each contain one or more cells. All split-pane layouts include only the Full cell shape because, in the general case, the others will not produce alignment to the margins in both frames. You can still create any layout in each of the two panes by running the script again with each pane selected.
- Second (bottom/right) — The grid dimensions of the second pane, which is on the bottom or the right.
- Split — The panes are arranged side by side (horizontal) or one above the other (vertical).
- Second Pane — The size of the second pane as a fraction of the space between margins.
Эти два скрипта сохраняют введенные вами параметры от запуска к запуску. Третьим скриптом (Photobook_Reset) производится сброс введенных вами величин к значениям «по умолчанию».
Автор набора скриптов — Bill Wetzel, набор найден на страницах немецкого сайта. Домашняя страница скрипта здесь.
Скрипты написаны на кроссплатфоменном языке javascript и предназначены для выполнения, по словам автора, в среде Indesign CS2 — CC на платформах Windows и MAC. Для использования скрипта в ID CS2 автор просит закомментировать в нём строчку с targetengine (поставить перед ней две косые черты):
//#targetengine «PhotoBookLayout»
Работоспособность проверена мною на ID CC 2017, MAC.
Скачать набор скриптов для фотоальбома Photobook.zip
Дополнительно по теме оформления фотоальбомов смотрите на нашем сайте:


 Скрипты Михаила Иванюшина
 Object Model") InDesign ExtendScript API Adobe InDesign 2020 Object Model
InDesign ExtendScript API Adobe InDesign 2020 Object Model Indesign Snippets
Последние комментарии